
When it comes to JavaScript and HTML 5 web application components there is absolutely none better than Kendo UI (http://www.telerik.com/kendo-ui). Kendo UI is not cheap and there can be a slight learning curve, but it is a spectacular piece of software. If you work in ASP.net MVC then spend the money and buy the server extensions. Amazing.
With that said, there are some quirks. Undocumented features some might call them. Here is one of those features.
I use the Kendo UI Grid A LOT. It is tremendously useful in a variety of applications. Recently, I was building an application where I was utilizing the “inline editing” feature of the grid. Kendo allows you to setup AJAX data-bindings for CRUD inside the grid. Then you can handle the actual create, read, update, delete actions in your controller. This works magnificently.
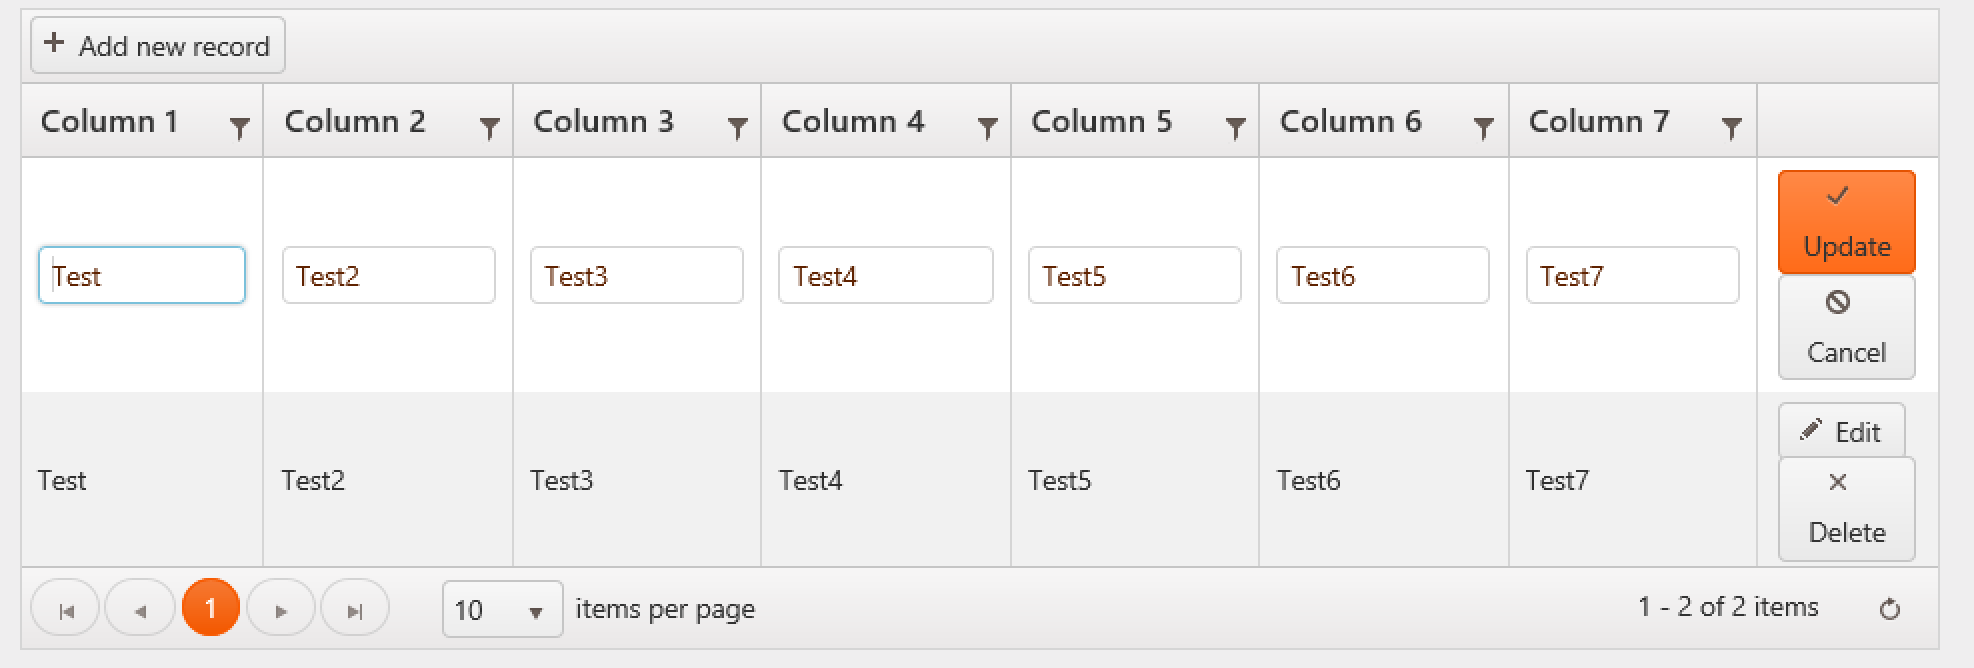
Kendo UI Grid in Edit Mode
The issue I had was that I wanted to restrict the user from updating a specific column in the grid when in Edit Mode.
Say, you have a grid setup like this:
1 2 3 4 5 6 7 8 9 10 11 12 13 14 15 16 17 18 19 20 21 22 23 24 25 26 27 28 29 30 31 32 33 34 35 36 37 38 | @(
Html.Kendo().Grid<KendoGridReadOnlyColumn.Models.TestModel>()
.Name("Blog_Grid")
.Columns(columns =>
{
columns.Bound(p => p.column1).Title("Column 1");
columns.Bound(p => p.column2).Title("Column 2");
columns.Bound(p => p.column3).Title("Column 3");
columns.Bound(p => p.column4).Title("Column 4");
columns.Bound(p => p.column5).Title("Column 5");
columns.Bound(p => p.column6).Title("Column 6");
columns.Bound(p => p.column7).Title("Column 7");
columns.Command(command => { command.Edit(); command.Destroy(); });
})
.ToolBar(tools =>
{
tools.Create();
})
.Pageable(pageable => pageable
.Refresh(true)
.PageSizes(new[] { 10, 20, 40, 60, 100, 200, 300 })
.ButtonCount(10)
)
.Sortable()
.Filterable()
.Resizable(resize => resize.Columns(true))
.Editable(editable => editable.Mode(GridEditMode.InLine))
.DataSource(datasource => datasource
.Ajax()
.PageSize(10)
.Model(model => model.Id(p => p.column1))
.Create(create => create.Action("Create", "Home"))
.Read(read => read.Action("Read", "Home"))
.Update(update => update.Action("Update", "Home"))
.Destroy(update => update.Action("Destroy", "Home"))
)
)
|
In this example, inline editing is a cinch to setup. Simply, make the grid editable and then setup the actions the grid should call on your controller for each of the CRUD operations.
Making the grid editable only occurs at the grid level. Telerik does not provide a mechanism for enabling/disabling a specific column. Although, as with most everything in programming, there is a way.
To make this work we are going to hook into the event architecture that the Kendo Grid provides. You can check out the documentation for all of the events here:
Specifically we are going to use the Edit event. The Kendo grid makes it super easy to fire off custom JavaScript based on these events. In this line we tell the Grid to call the [function name] JavaScript function whenever the grid enters the edit mode.
1 | .Events(events => events.Edit("edit"))
|
Now we just need to write a little JavaScript to make the first column read-only. We have told the Grid to call the edit() javascript function.
<script type="text/javascript">
    function edit(e) {
        if (e.model.isNew() == false) {
            $("#column1").attr("readonly", true);
        }
    }
</script>
In this code we are checking to see if the Grid is creating a new record or if we are editing an existing record. If not new, then we want to disable the first column by using jQuery to find our element and then adding the html “readonly” attribute.
This is great for times when you are using a naturally occurring key and don’t want to allow the user to change it in edit mode.
Source code formatting by: http://hilite.me/
Check out Clarity Issue Tracking - Unlimited Users, Unlimited Projects. Get Clarity with in your projects!